
Want to install Android 14 on your Redmi Note 10 Pro? You are in the right place. This comprehensive, step-by-step guide walks you through the complete process of flashing the AOSP custom ROM on the Redmi Note 10 Pro (codename: sweet).
Even though Xiaomi has ended official software support for the Redmi Note 10 Pro (which shipped with Android 11 and received Android 13 as its final update), you can breathe new life into this Snapdragon 732G-powered device with Android 14. This custom ROM delivers the latest Android features, improved performance, better battery optimization, enhanced privacy controls, and a clean AOSP stock Android experience.

Why Install Android 14 on Redmi Note 10 Pro?
The Redmi Note 10 Pro (released March 2021) was a popular mid-range smartphone powered by the Qualcomm Snapdragon 732G processor with 6GB or 8GB RAM and a gorgeous 6.67 inch AMOLED display. Despite being a capable device, Xiaomi ended official software support at Android 13 (MIUI 14), leaving users stuck on outdated software with potential security vulnerabilities.
Installing Android 14 via AOSP gives your Redmi Note 10 Pro a second life with:
Protection against current known vulnerabilities and exploits.
AOSP-based ROMs are usually leaner and faster than stock firmware.
Android 14 power optimizations can improve battery efficiency.
Run newer apps that require recent Android API levels.
Android 14 Key Features You'll Get on Redmi Note 10 Pro
Android 14 on Redmi Note 10 Pro with AOSP delivers a modern Android experience. Android 14 adds practical upgrades across security, personalization, and performance. Here are the major features you can use after flashing this build:
Lock Screen Controls
Power Efficiency
Ultra HDR Media
Material Personalization
Permission Hardening
Multitasking Improvements
Important Warnings — Read Before Installing Android 14
Device-specific ROM: This Android 14 custom ROM is ONLY for the Redmi Note 10 Pro. Do not flash it on any other device — it will brick your device.
Brick risk: Carefully follow every step in the correct order. Incorrect installation — such as flashing the wrong file, interrupting the process, or skipping the wipe — can permanently brick your Redmi Note 10 Pro. TheUpgradeGuide is not responsible for any damage.
Complete data wipe: Installing this custom ROM erases everything on your Redmi Note 10 Pro — apps, photos, contacts, messages, and files. Create a complete backup before proceeding.
Battery requirement: Charge your Redmi Note 10 Pro to at least 50–60% before starting. An accidental shutdown during the flashing process can leave your device in a non-bootable state.
Warranty void: Unlocking the bootloader and installing a custom ROM will void your manufacturer warranty.
Pre-Installation Requirements for Redmi Note 10 Pro
Make sure you have all of the following ready before starting the Android 14 installation on your Redmi Note 10 Pro:
Unlocked bootloader: Your Redmi Note 10 Pro must have an unlocked bootloader. Use Xiaomi’s official Mi Unlock Tool if you haven’t done this. The process requires linking your Mi account and waiting approximately 7 days.
TWRP Recovery installed: You must have TWRP Recovery installed on your Redmi Note 10 Pro. Watch TWRP installation tutorial for Redmi Note 10 Pro →
Full data backup: Back up all important data — photos, contacts, messages, app data, WhatsApp chats, and files — before starting the installation. Consider using Google Backup and Google Photos for cloud backup.
USB drivers installed: Install the appropriate USB drivers on your PC/Mac. These are needed if you’re using ADB/Fastboot for any part of the process.
XDA Forum Thread: AOSP for Redmi Note 10 Pro — XDA Forum →
Always check this XDA Forum thread for the latest build updates, known bugs, required patches, firmware requirements, and community feedback before installing.
Download Android 14 ROM & GApps for Redmi Note 10 Pro
AOSP ROM (AOSP-Based Android 14) for Redmi Note 10 Pro
Google Apps (GApps) for Android 14 ARM64 – Choose One Package
Not sure which GApps to pick? Read our complete GApps compatibility guide ->
Quick Installation Overview
Short on time? Here’s the 5-step summary of how to install Android 14 on your Redmi Note 10 Pro. Scroll down for the detailed guide with screenshots.
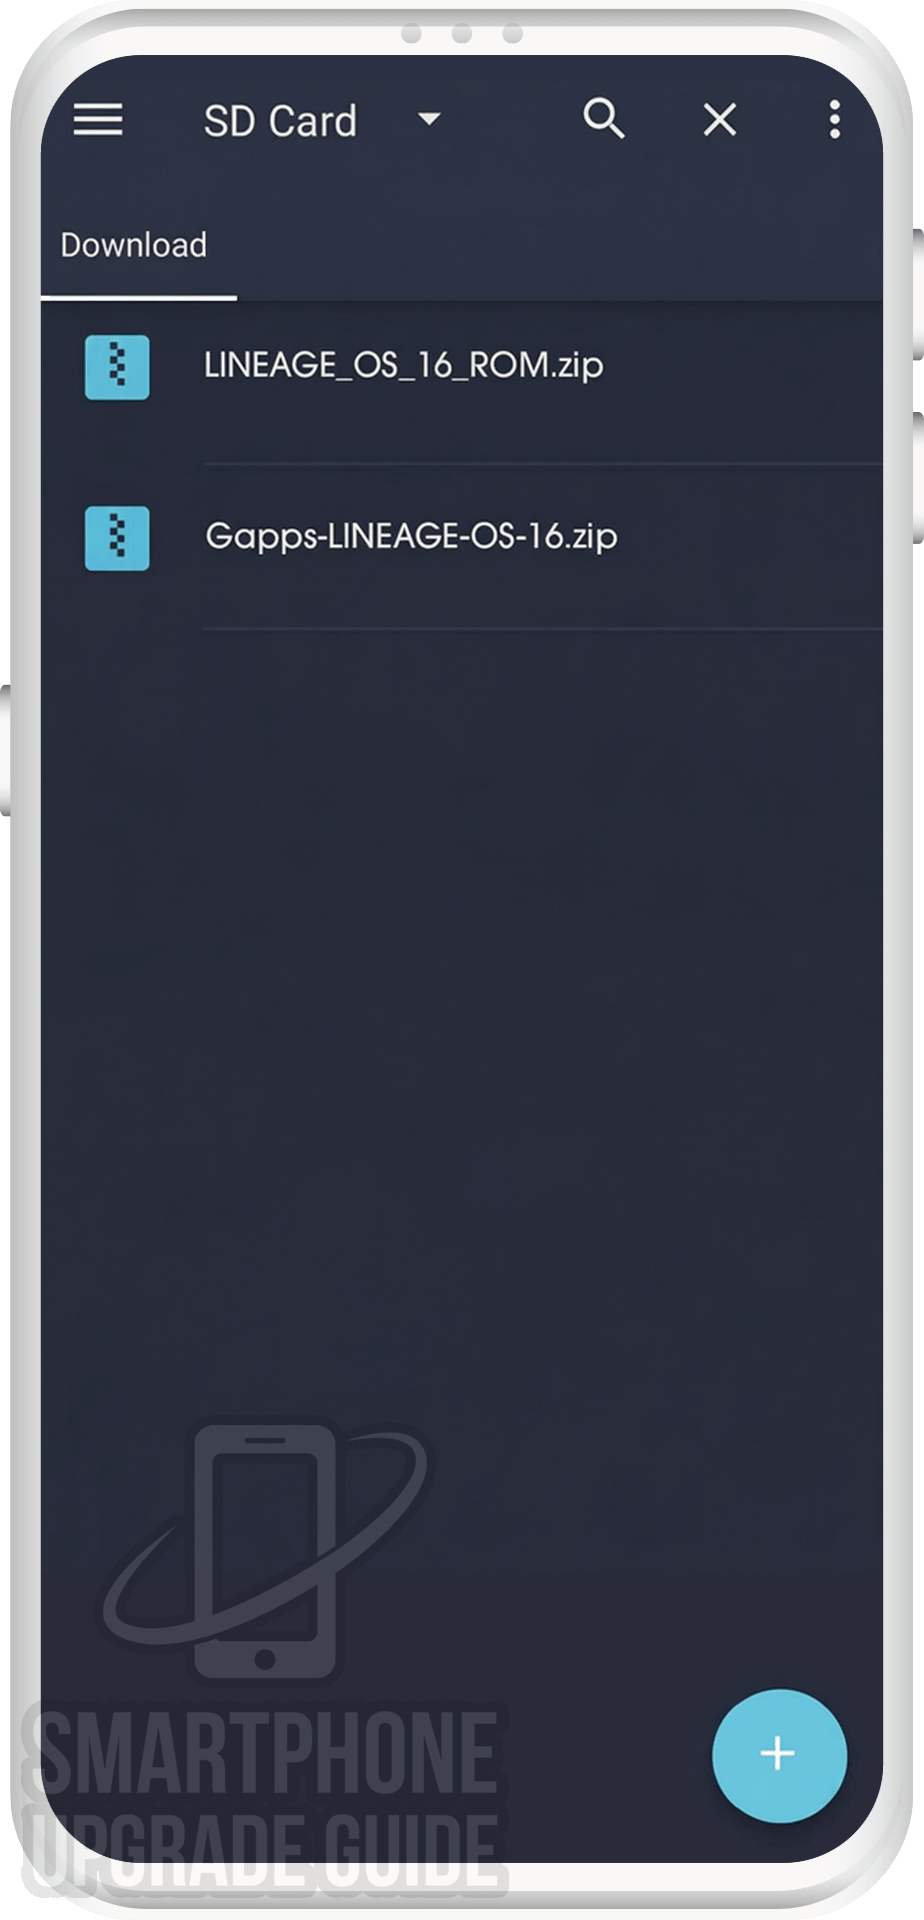
- 1Download the AOSP Android 14 ROM & GApps for Redmi Note 10 Pro.
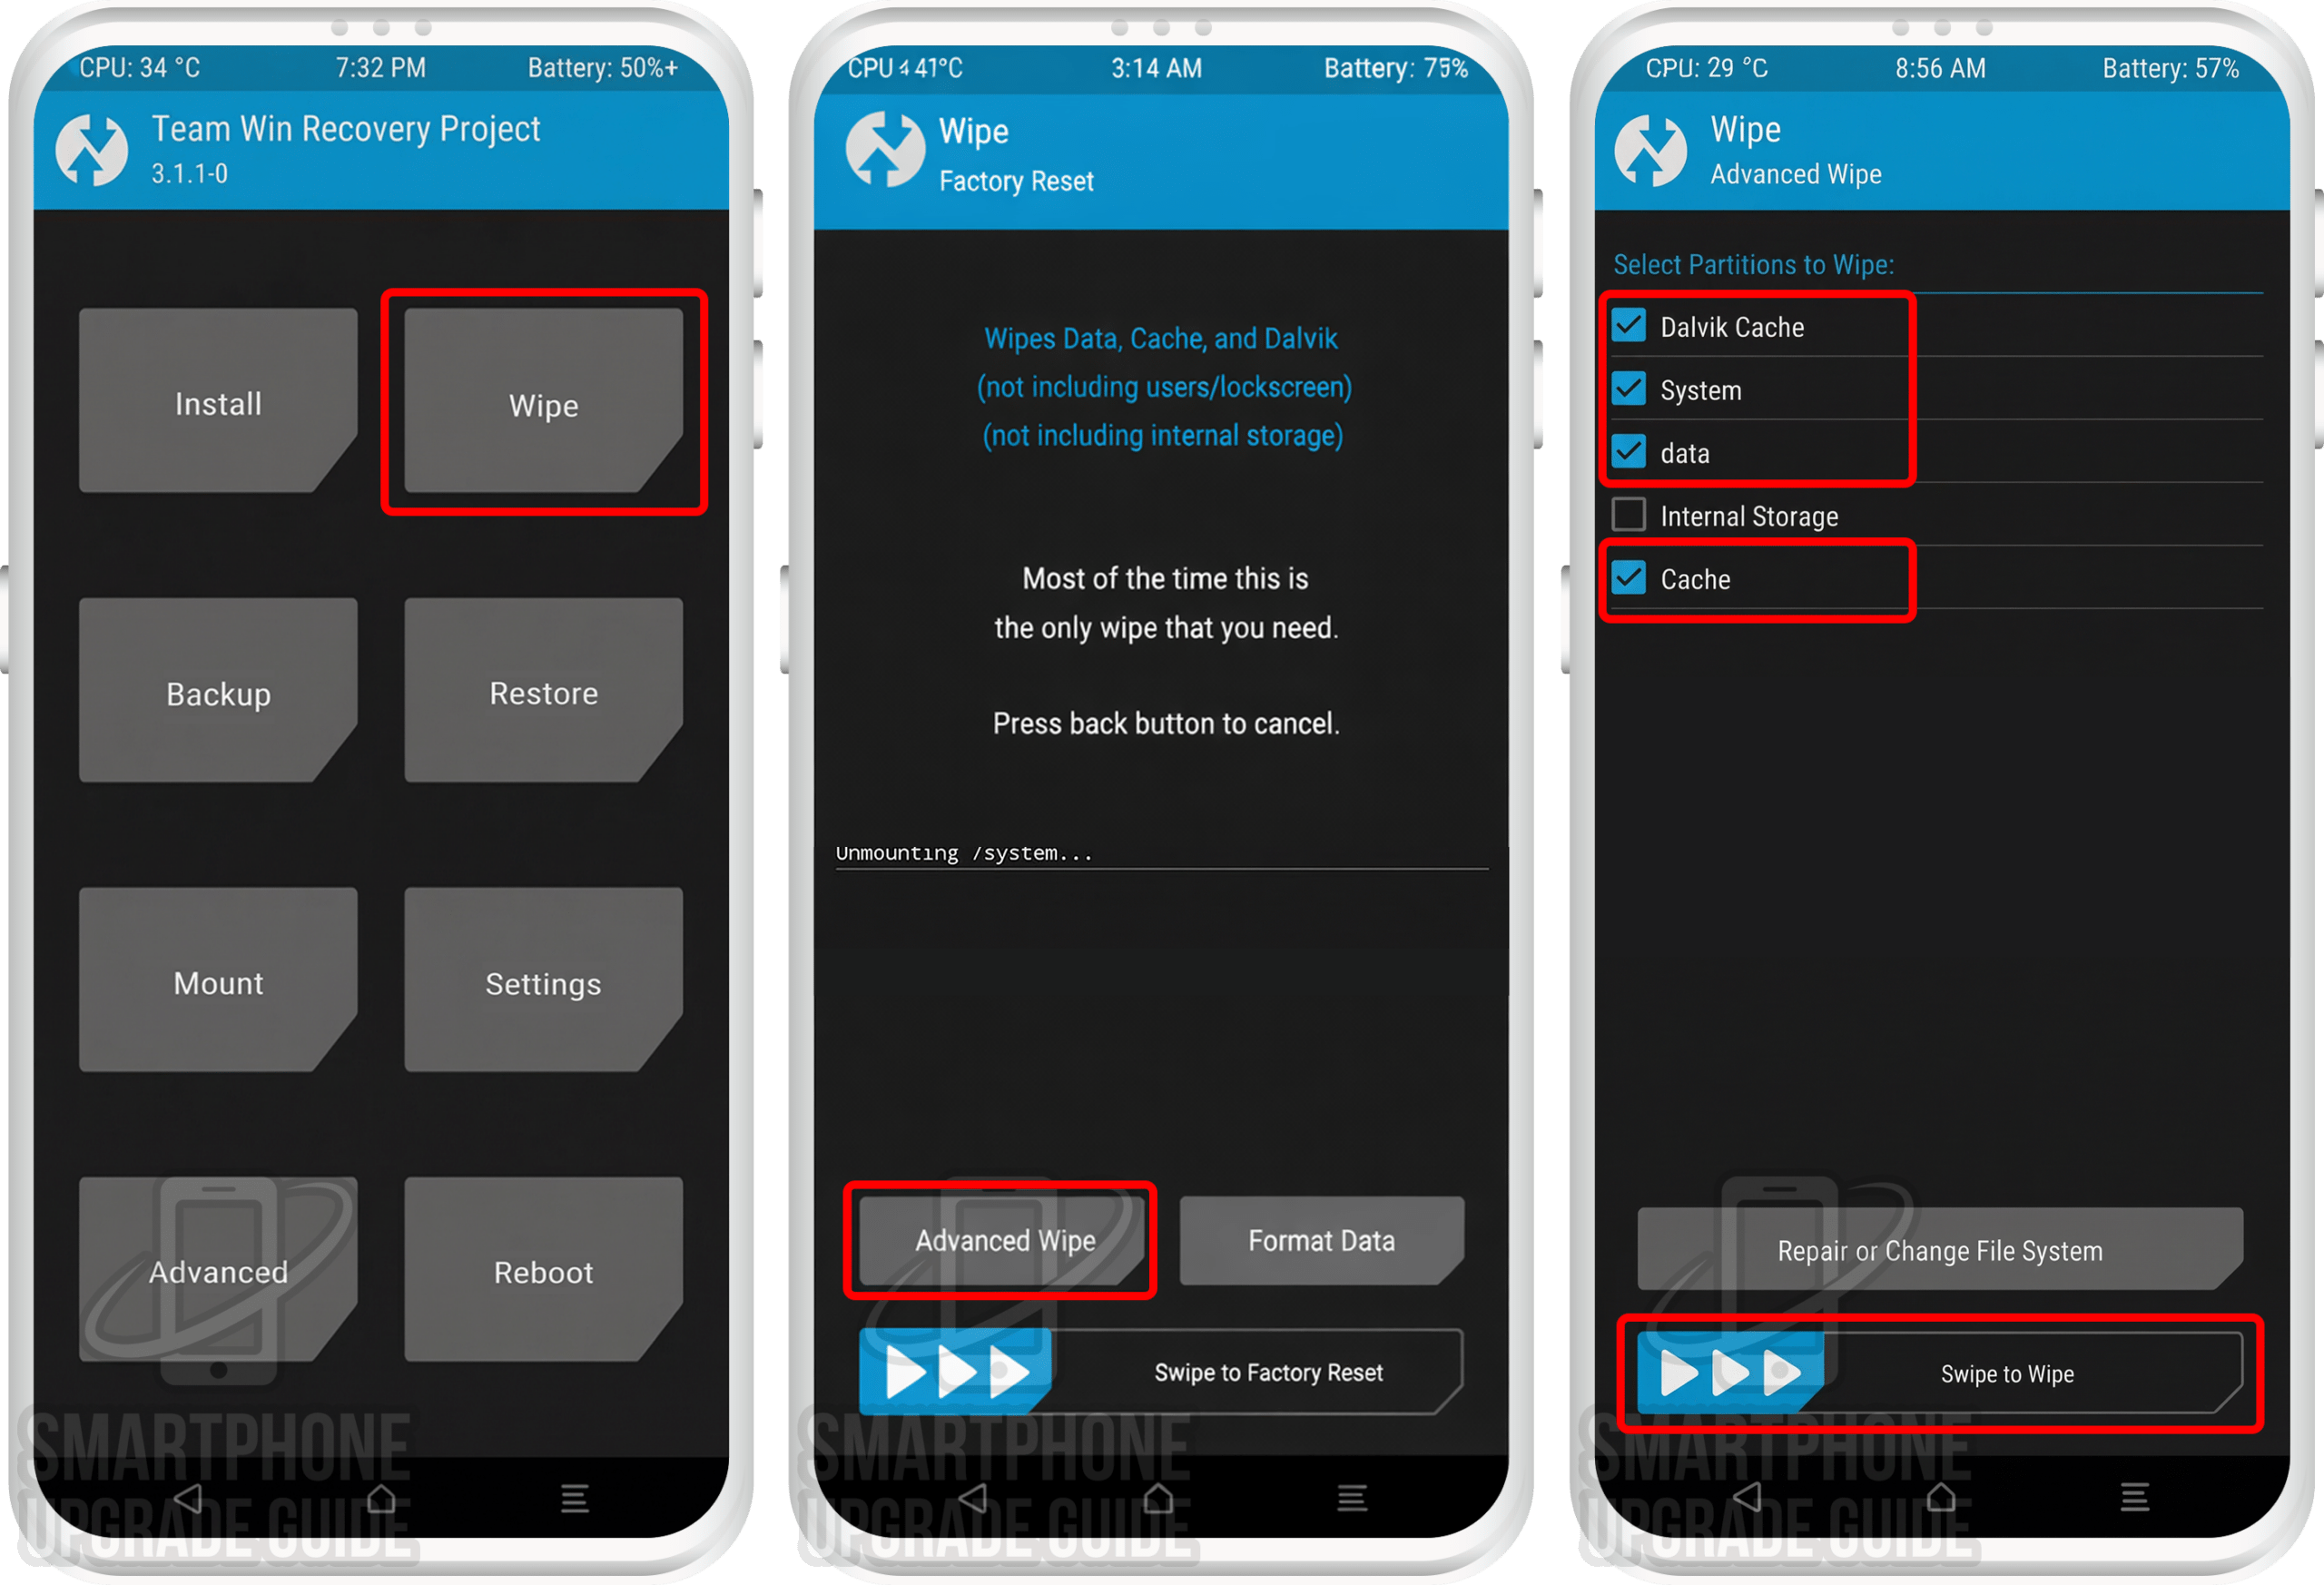
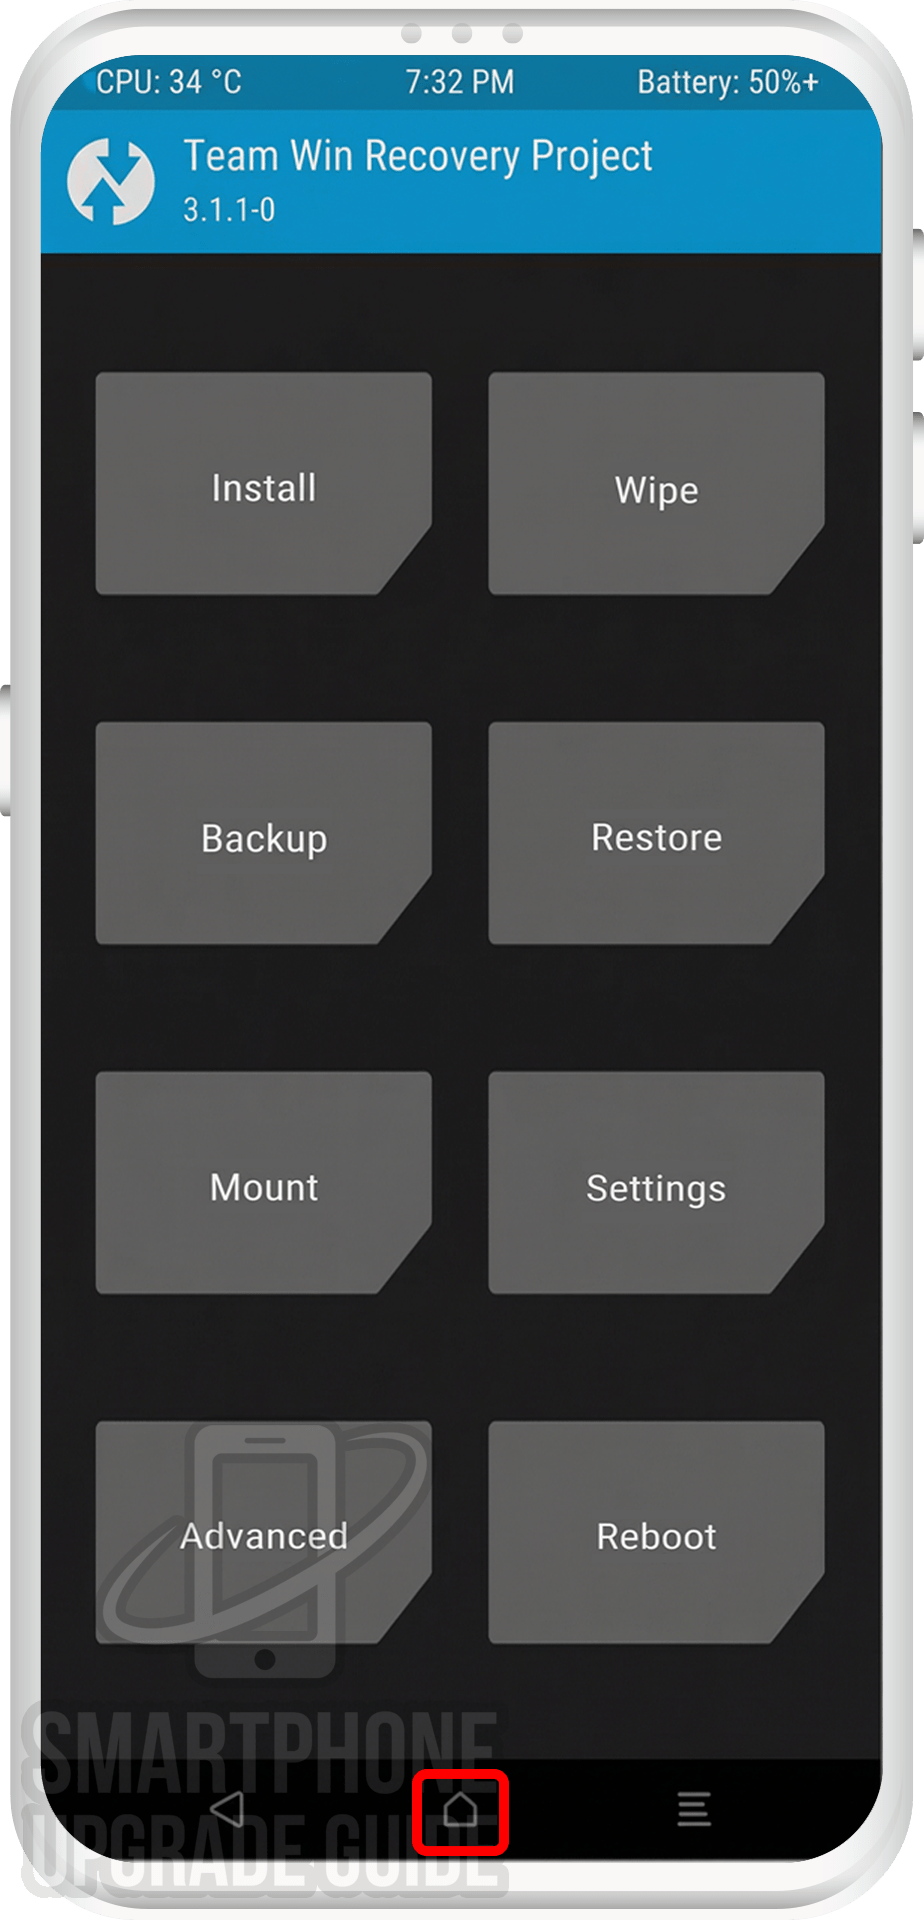
- 2Boot your Redmi Note 10 Pro into TWRP custom recovery mode.
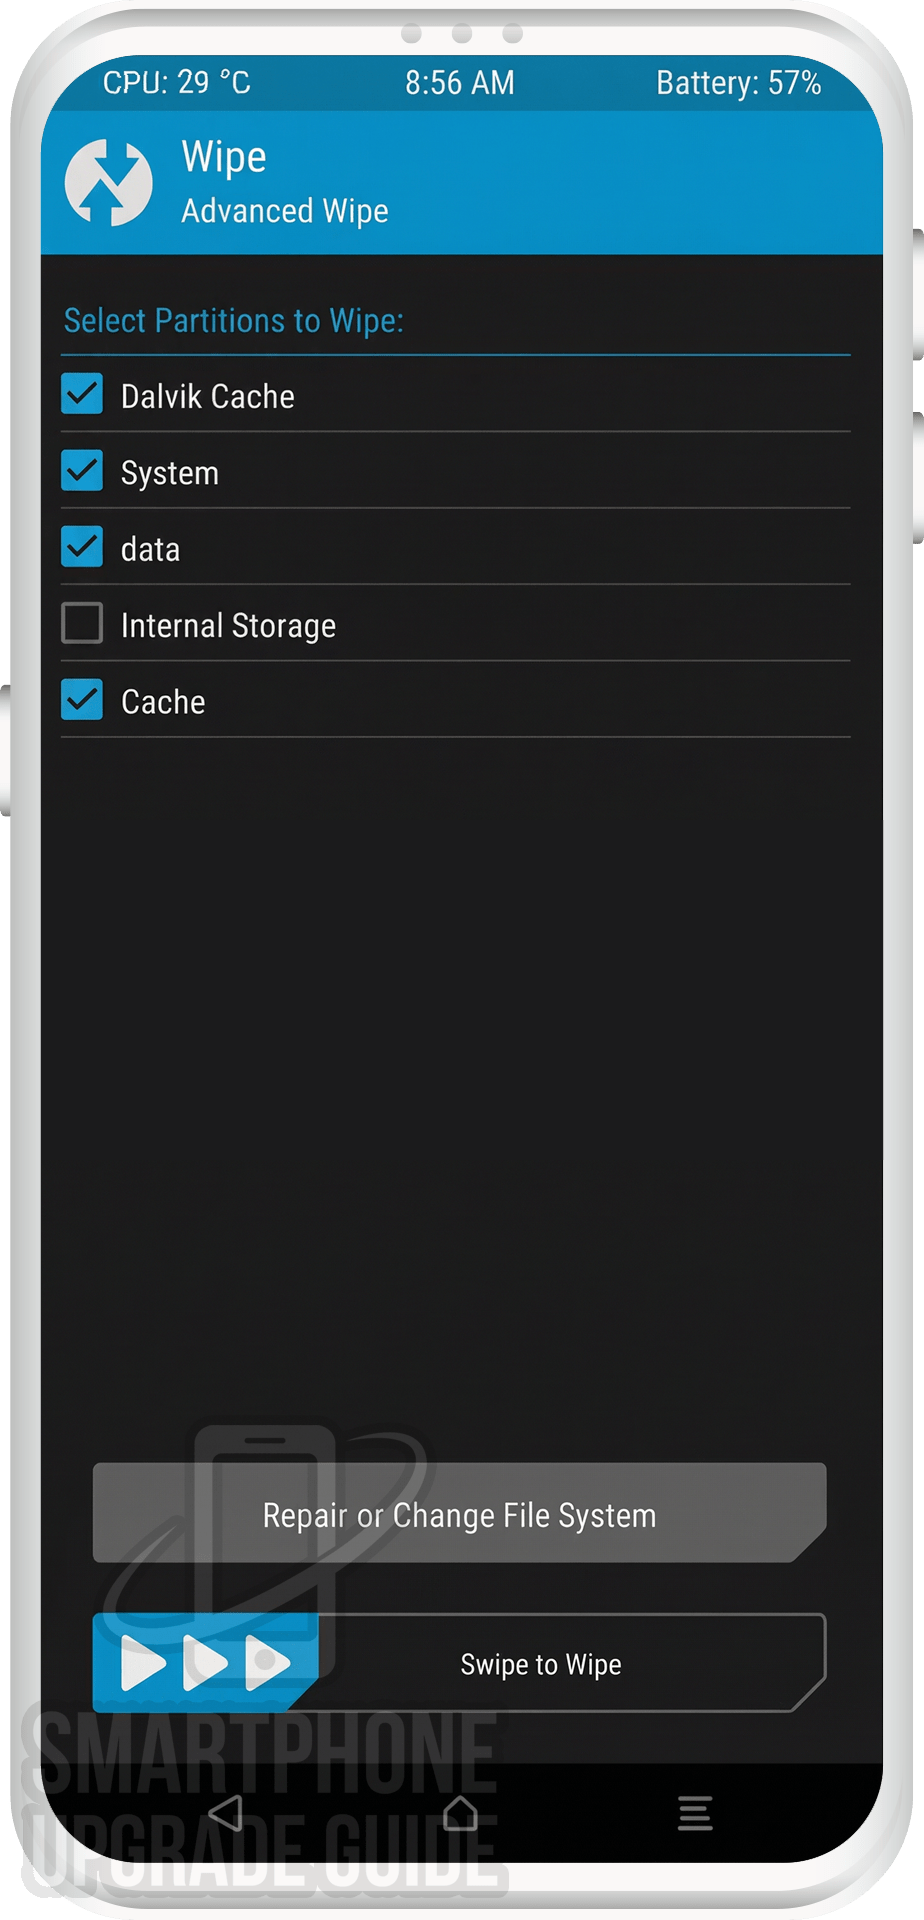
- 3Wipe system, vendor, data, cache, and dalvik cache partitions.
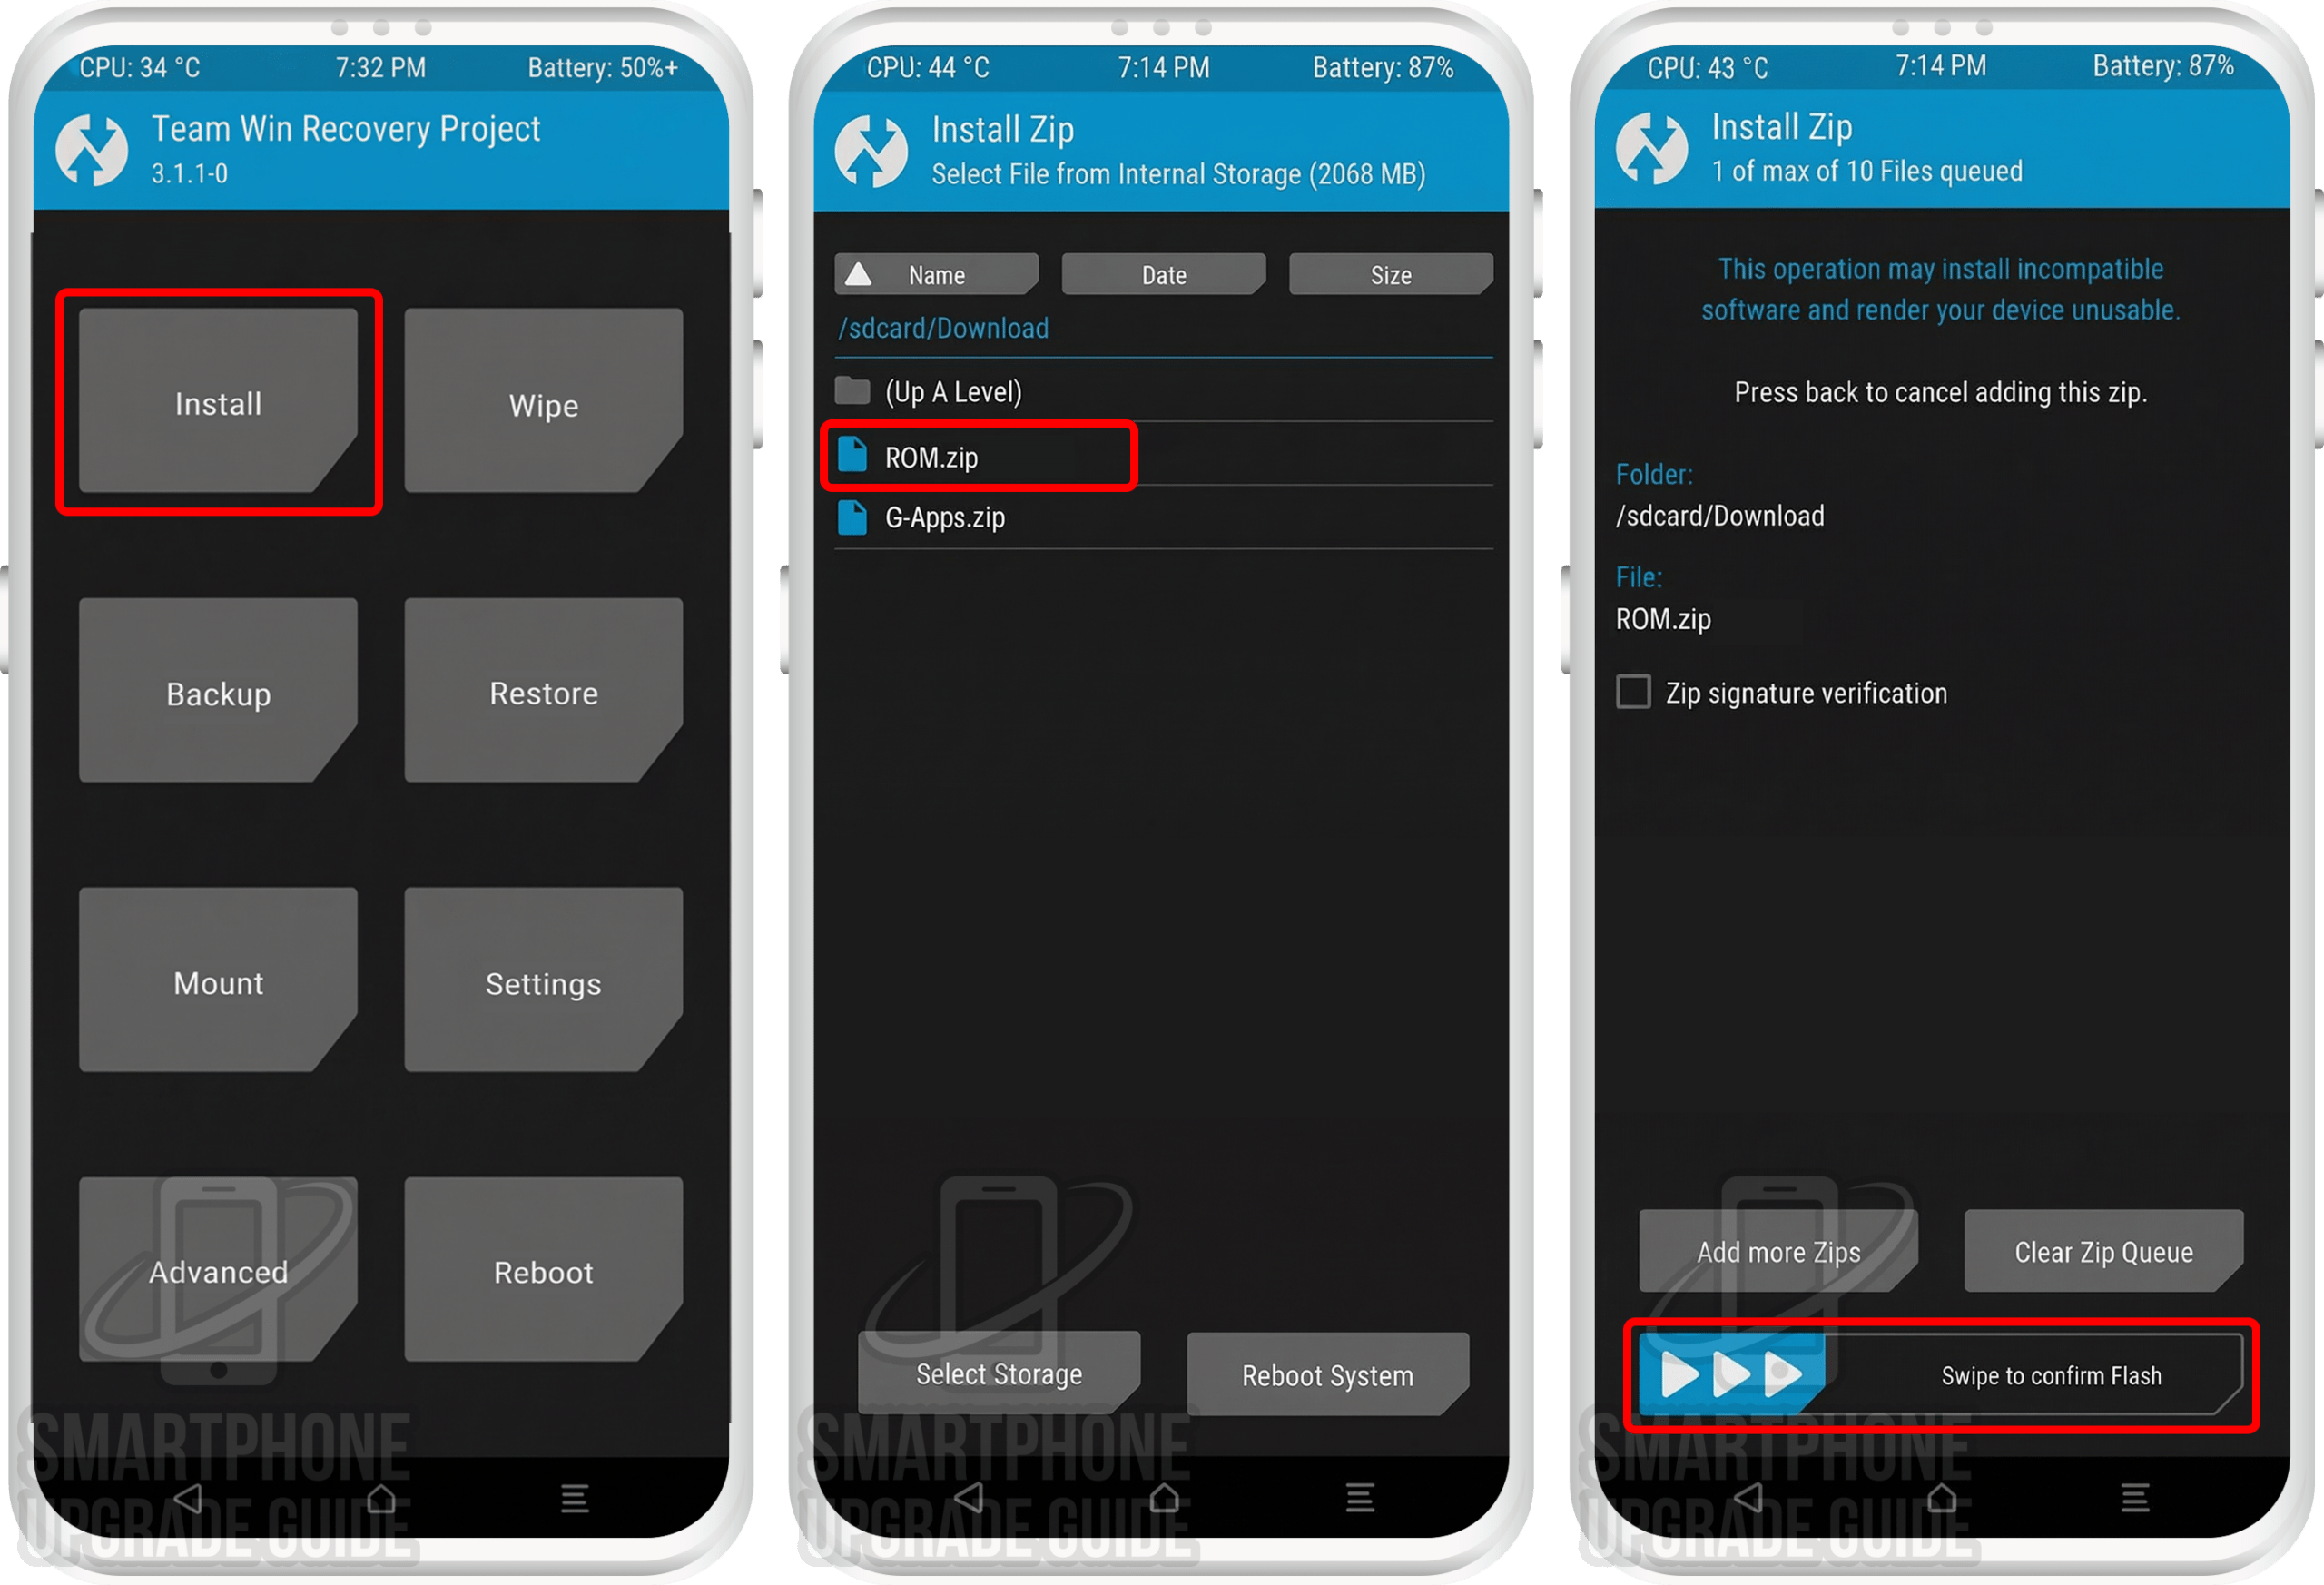
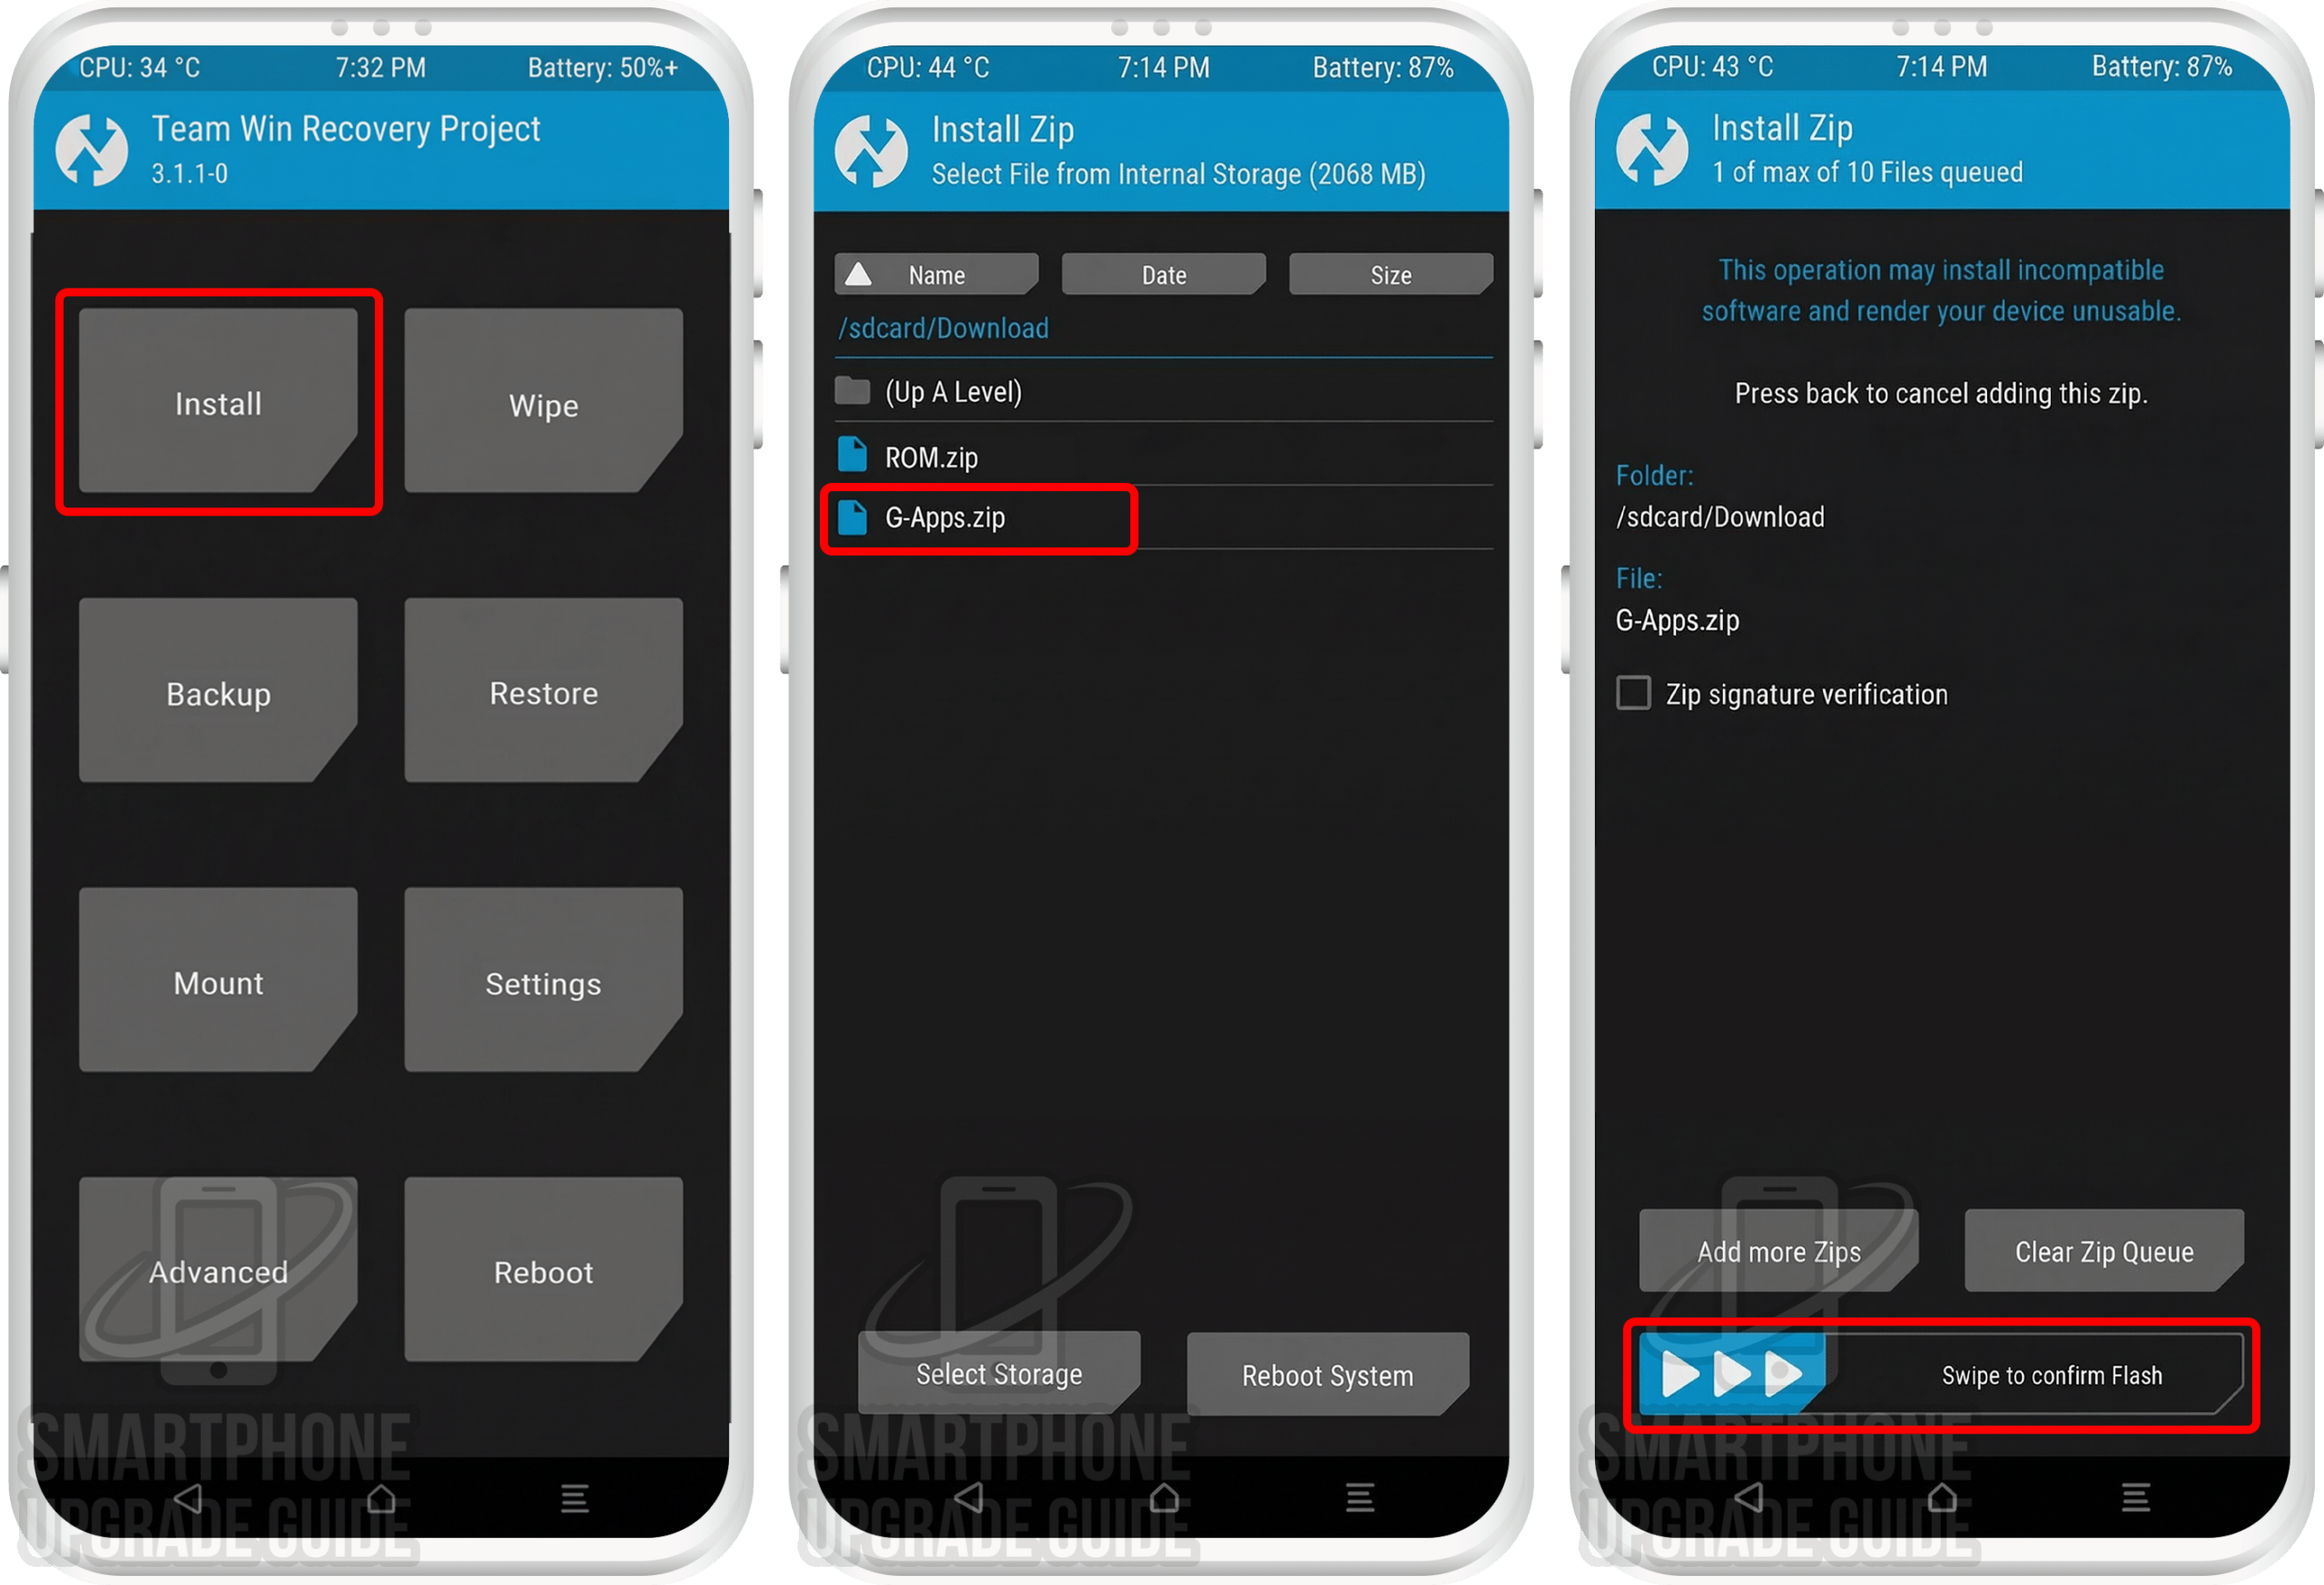
- 4Flash the Android 14 ROM zip followed by the GApps zip via TWRP Install.
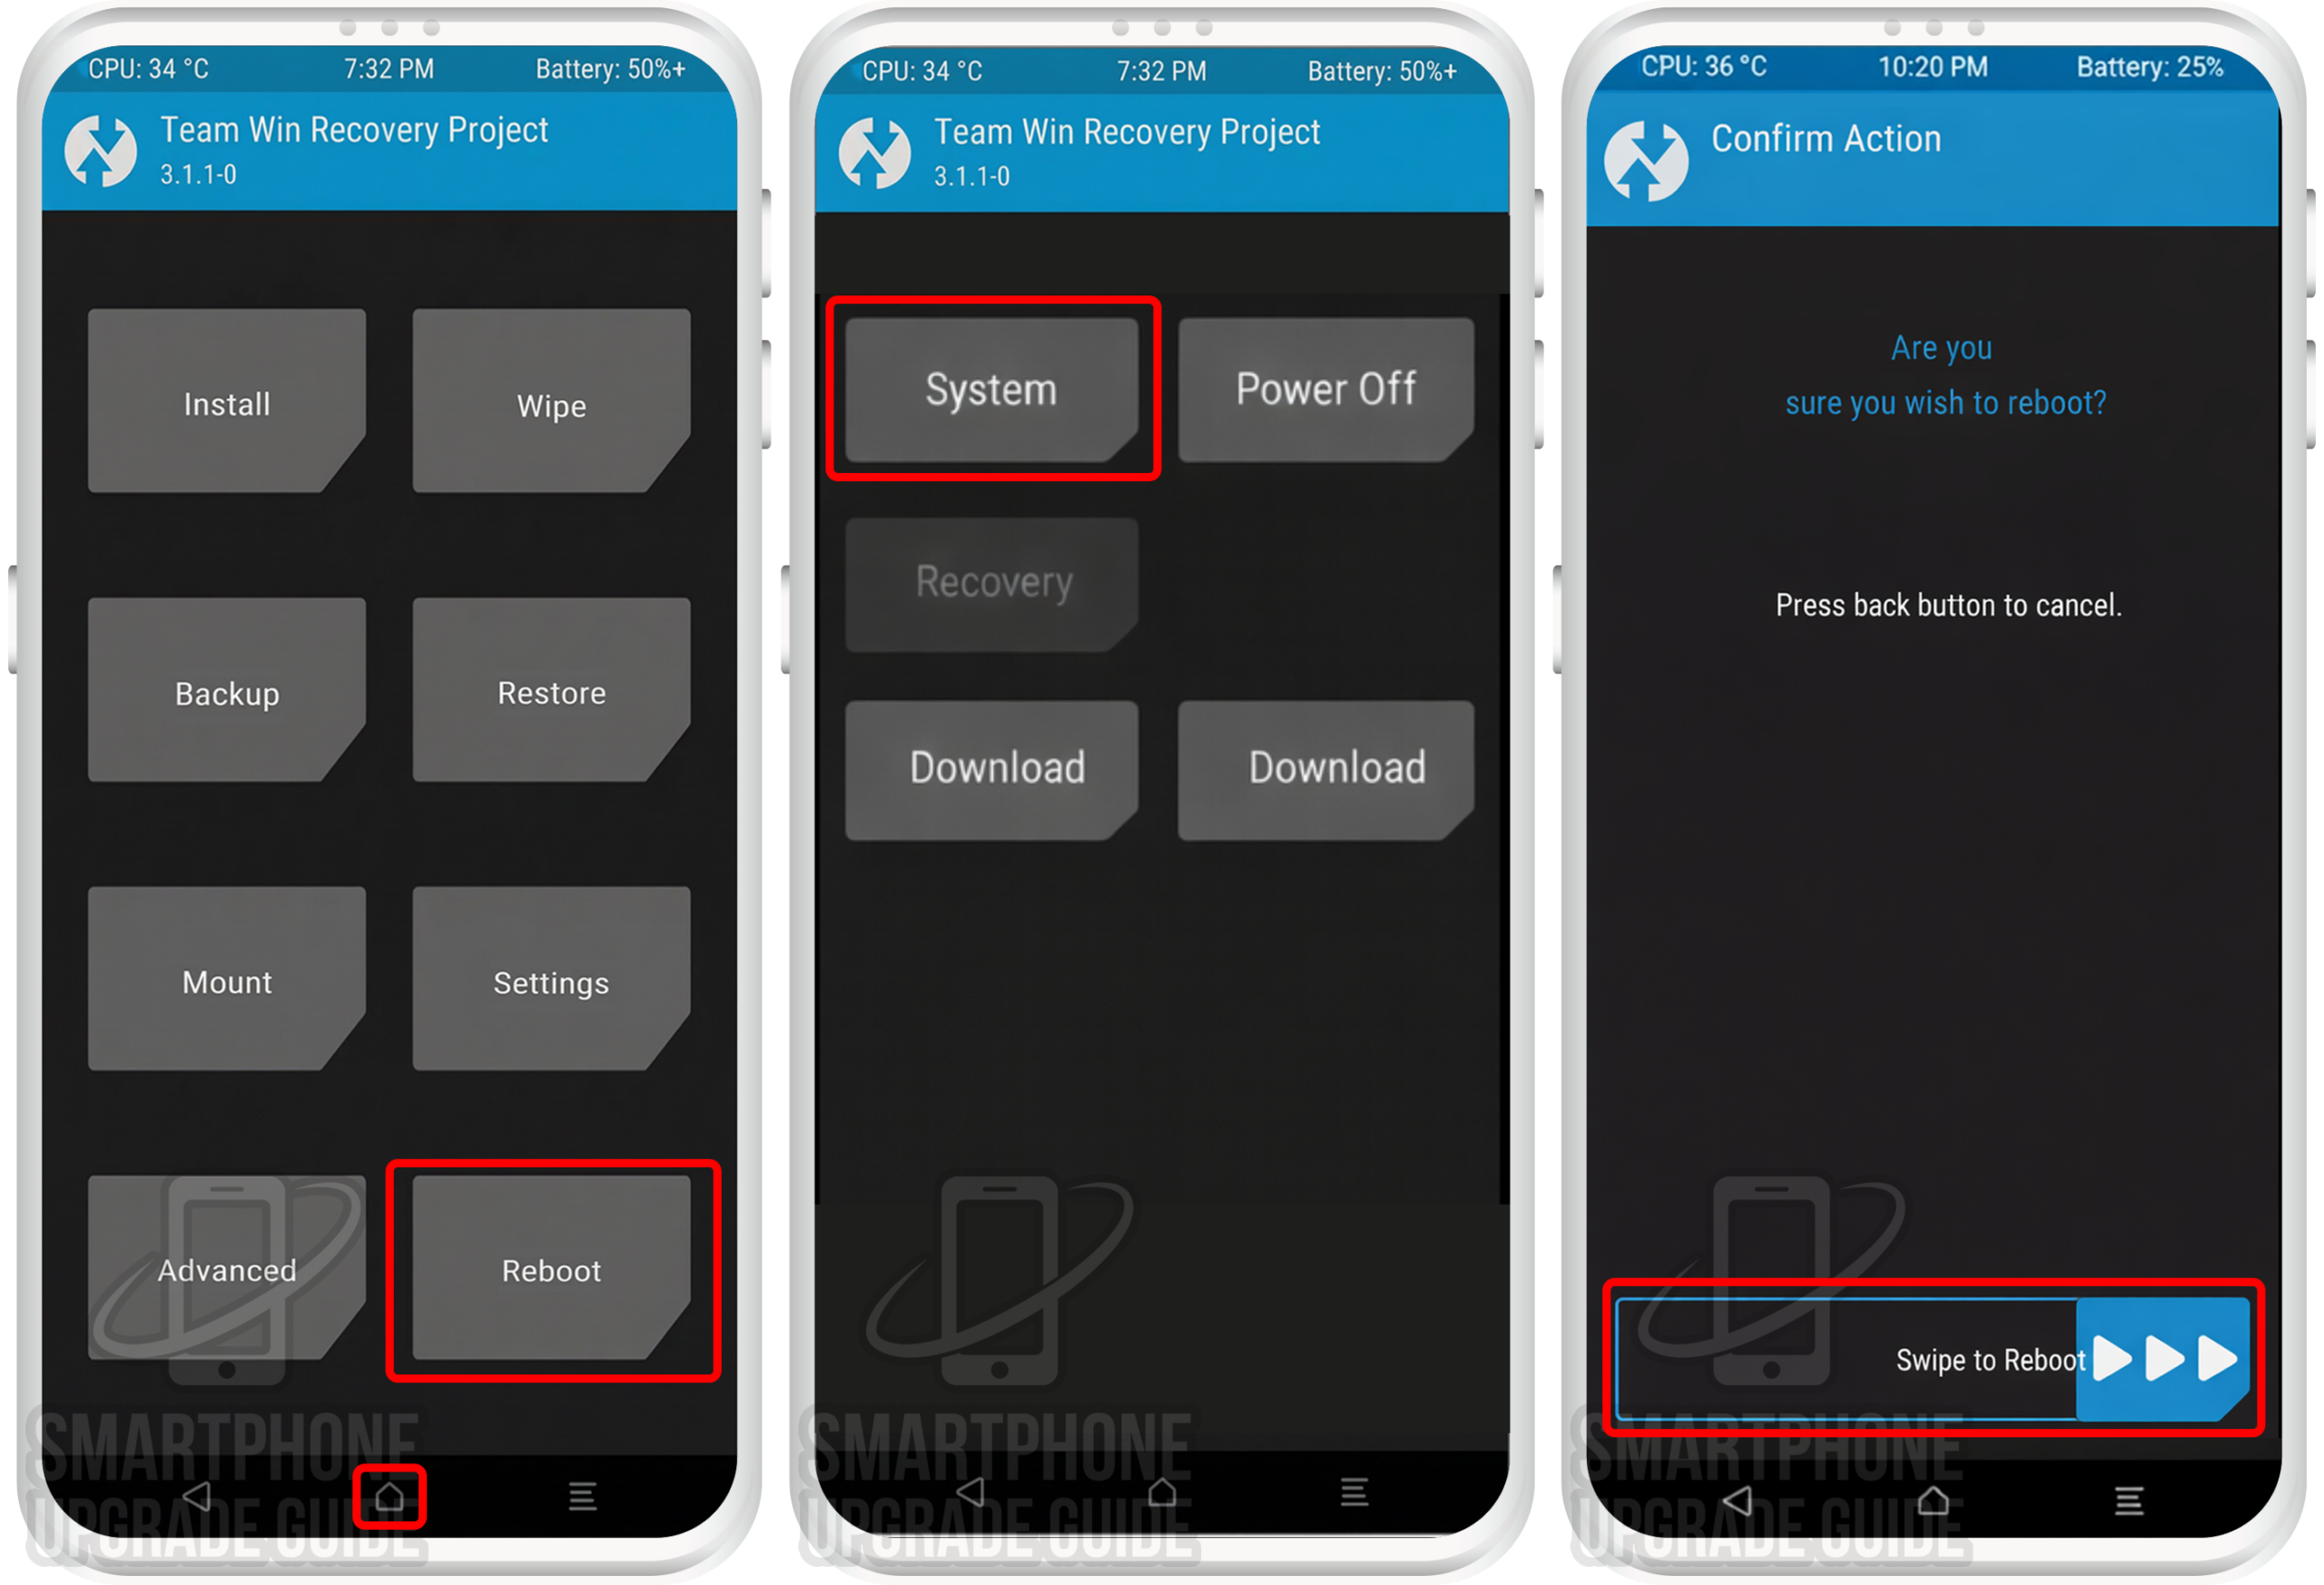
- 5Wipe cache, reboot, and enjoy Android 14 on your Redmi Note 10 Pro!
Step-by-Step: Install Android 14 on Redmi Note 10 Pro
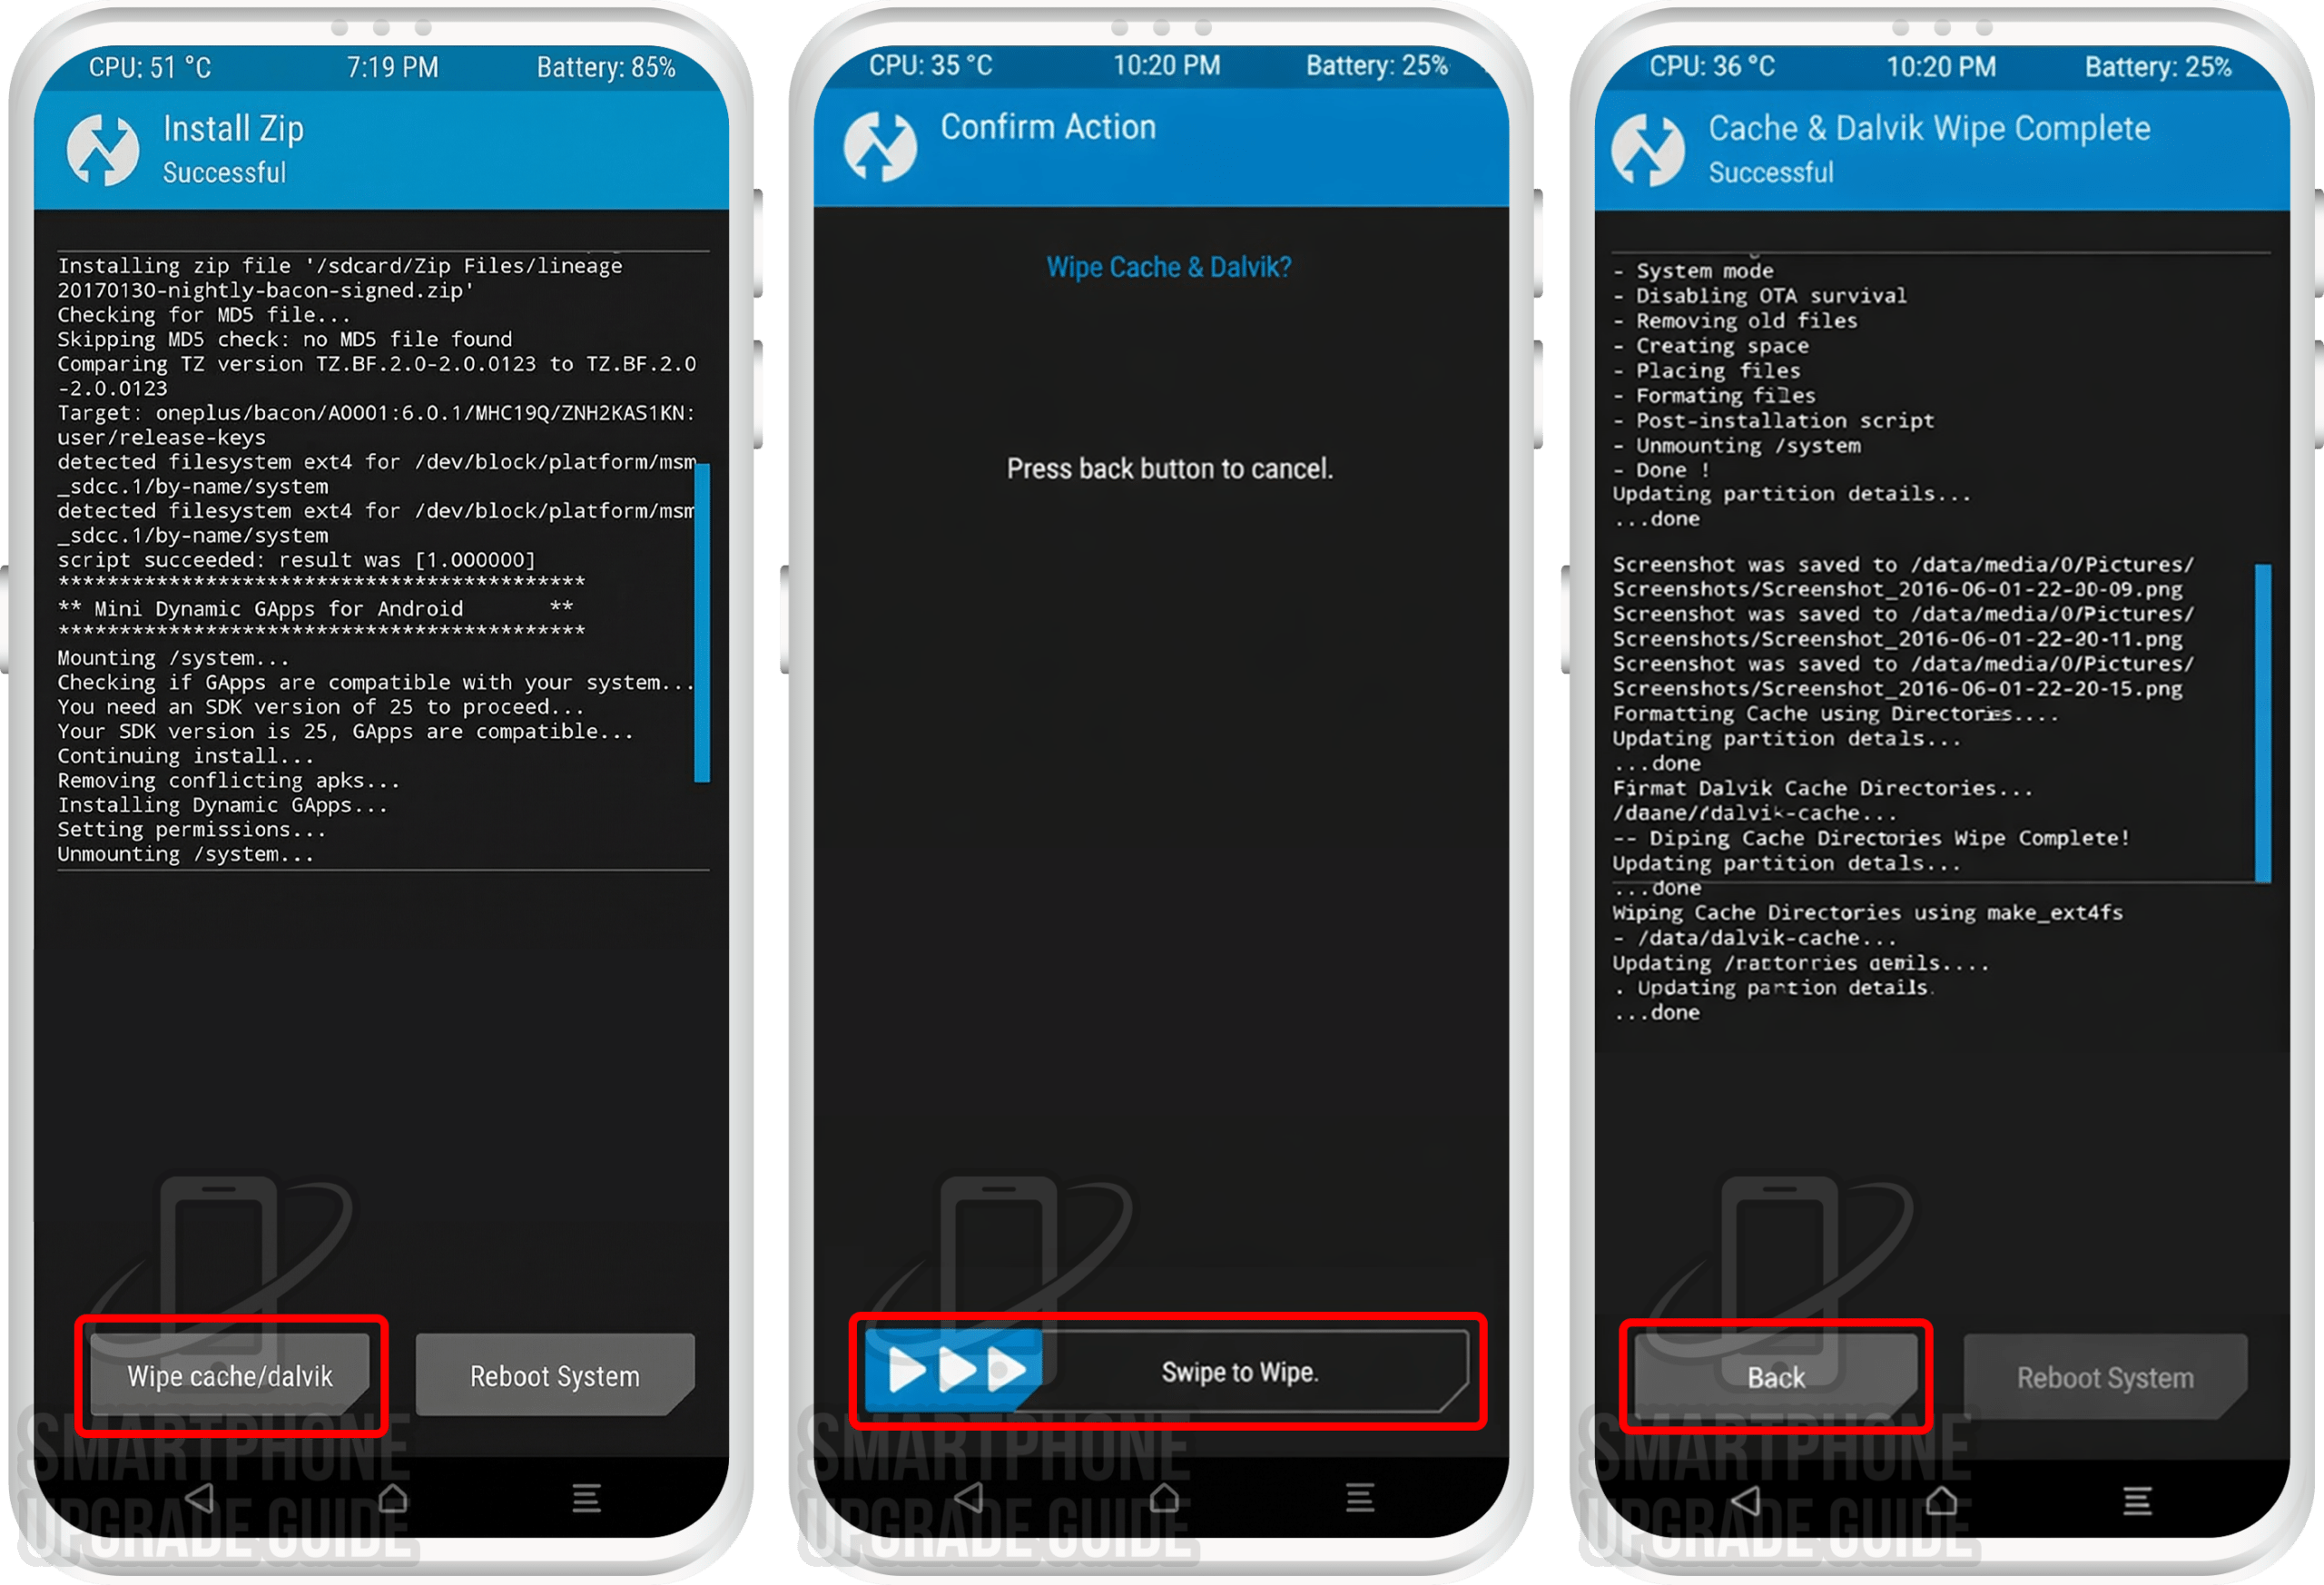
Android 14 Successfully Installed on Your Redmi Note 10 Pro!
Congratulations! You’ve successfully installed Android 14 (AOSP) on your Redmi Note 10 Pro. Enjoy the latest Android features, improved performance, enhanced security, and a clean stock Android experience on your refreshed device!
What’s Working & Not Working on Android 14 (Redmi Note 10 Pro)
Based on the XDA Forum thread and community reports, here’s the current status of features on the AOSP (Android 14) ROM for the Redmi Note 10 Pro. Note: This may vary between builds, so always check the latest forum post.
Working
- ✅ Phone calls & SMS
- ✅ Wi-Fi & Hotspot
- ✅ Mobile data (4G LTE)
- ✅ Bluetooth & audio
- ✅ Camera (photo & video)
- ✅ GPS & location
- ✅ Fingerprint sensor
- ✅ NFC
Known Issues
- ⚠️ Minor camera quirks in some modes
- ⚠️ Some hardware features may vary by build
Always check the XDA Forum thread for the most up-to-date bug list for your specific build version.
Troubleshooting Common Issues
🔄 Stuck on Boot Animation (Bootloop)
If your Redmi Note 10 Pro is stuck on the boot animation for more than 15 minutes, it may be bootlooping. Reboot into TWRP (Power + Vol Up), perform a full wipe (System, Data, Cache, Dalvik), and re-flash the ROM and GApps. Make sure you’re using compatible GApps for Android 14 arm64.
❌ “Error 7” or “Zip Verification Failed”
This usually means you’re flashing a ROM not built for your device. Double-check that the ROM zip is specifically for the Redmi Note 10 Pro. Also ensure your TWRP version is up-to-date and compatible with Android 14 ROMs.
📱 No Mobile Data or Signal After Installation
You may need to flash the correct firmware (baseband/modem) before installing the ROM. Check the XDA Forum thread for the recommended firmware version for your build of AOSP.
🔙 How to Restore Back to Stock ROM
If you want to go back to the stock ROM: (1) restore your Nandroid Backup via TWRP → Restore, or (2) download the official stock ROM from the manufacturer and flash it using the appropriate flash tool on your PC. This will completely restore your Redmi Note 10 Pro to factory stock condition.
Frequently Asked Questions — Android 14 on Redmi Note 10 Pro
Here are answers to the most commonly asked questions about installing and using Android 14 (AOSP) on the Redmi Note 10 Pro:
Is the Android 14 ROM for Redmi Note 10 Pro stable enough for daily use?
The AOSP (Android 14) ROM for the Redmi Note 10 Pro is an unofficial build. Core features — including phone calls, Wi-Fi, mobile data, camera, Bluetooth, GPS, and the fingerprint scanner — work well in most builds. Some minor bugs may exist depending on the build version. We recommend checking the XDA Forum thread for the latest known issues before installing it as your daily driver.
Will installing a custom ROM void my Redmi Note 10 Pro warranty?
Yes, unlocking the bootloader and installing a custom ROM voids the manufacturer warranty. However, since the Redmi Note 10 Pro was released in September 2019, virtually all units are well past their warranty period, so this shouldn’t be a concern for most users.
Can I go back to stock ROM after installing Android 14 on my Redmi Note 10 Pro?
Absolutely. You have two options: (1) Restore your Nandroid Backup through TWRP Recovery to return to your exact previous ROM state, or (2) Download the official stock ROM from the manufacturer’s website and flash it using the appropriate flash tool to perform a clean restore to stock firmware.
Which GApps package should I use with Android 14 on Redmi Note 10 Pro?
You can choose from four popular options: LiteGApps (recommended for minimal footprint), NikGApps (offers granular control over which Google apps to install), MindTheGApps (balanced package), or BiTGapps (lightweight alternative). All must be the ARM64 variant for Android 14 (API 34). Read our complete GApps compatibility guide to choose the best option for your needs.
Do I need an unlocked bootloader to install Android 14 on Redmi Note 10 Pro?
Yes, an unlocked bootloader is a mandatory prerequisite. Without it, you cannot install TWRP Recovery or flash any custom ROM. Use the manufacturer’s official unlock tool to request a bootloader unlock. The process typically involves a waiting period before the unlock is approved.
Does the Android 14 ROM support the Redmi Note 10 Pro’s fingerprint scanner?
Yes, in most AOSP builds for the Redmi Note 10 Pro, the fingerprint scanner works correctly. However, functionality can occasionally vary between different build versions. If the fingerprint scanner isn’t working after installation, try updating to the latest build or check the XDA Forum for any required patches.
How do I update the Android 14 ROM on my Redmi Note 10 Pro after installation?
To update to a newer build of AOSP: Download the latest ROM zip from the LineageOS download page, transfer it to your device, reboot into TWRP, and flash the new ROM zip over the existing installation (this is called a “dirty flash”). Then wipe cache/dalvik and reboot. A full data wipe is usually not needed for minor updates, but always check the XDA thread for update-specific instructions.
Is the Xiaomi Mi CC9 the same as the Redmi Note 10 Pro for custom ROM installation?
Yes, the Xiaomi Mi CC9 and Redmi Note 10 Pro are the same hardware device sold under different names in different regions. The Mi CC9 was the Chinese variant, while the Redmi Note 10 Pro was the global/international variant. Both use the exact same ROM, TWRP recovery, firmware, and kernel files. You can follow this same guide for either device.
Have questions or ran into issues while installing Android 14 on your Redmi Note 10 Pro? Drop a comment below and we’ll help you out! You can also get support from the XDA Forum community where the ROM developer and experienced users actively respond to questions.